CMS
Setup a Nexus powered website under 1 minute.
Overview
Features
- Nexus authoring
Create and edit Nexus instances, with the reader app and theme of your choice.
The web pages and Nexus .json source files are automatically built and deployed.
- Static pages
Additionnally create and edit custom web pages, with any kind of content.
Rich text editor and markdown mode. Support for all markdown/class-less themes.
- Live previews
- Media manager
- Navigation widgets
Free, open source, and extensible.
Under the hood, Nexus CMS makes use of 11ty to generate files, and Netlify CMS for a user-friendly backend.
Screenshots


Installation
Some steps can not be automated, but it’s super easy and should take less than 1min.
I’m an old dog
- Click the
Deploy to Netlifybutton and follow steps. - In the Netlify site settings, setup
Netlify Identity,GitHub OAuthandGit Gateway. - Go to
http://your-site-name.netlify.app/admin>Settings>Site, enter your site url and publish.
Step-by-step please
If you’re unfamiliar with GitHub or Netlify, the Third Parties section is there for you.
One-click Deploy
- Click the
Deploy to Netlifybutton. You will be redirected to Netlify. - Next, you’ll be asked to connect to GitHub.
Create an account if you do not already have one.
When prompted, clickAuthorize netlify. - Once you’re back to the Netlify setup page, choose your repository name.
ClickSave and Deploy.
Configure Netlify
- You should now see your Netlify site dashboard.
Go toSite settings. - In the
Generaltab: change your site name (unless you fancy the random one!).
Your Nexus website will be accessible athttp://your-site-name.netlify.app.You can also set up a custom domain if you wish to, going to the the
Domain managementtab. - Now, let’s activate authentication.
In theIdentitytab: clickEnable Identity.- In the
Registration preferencessection: clickEdit settingsand selectInvite only. - In the
External providerssection: clickAdd provider>GitHub>Use default configuration. - Finally scroll down to the
Service>Git Gatewaysection, and clickEnable Git Gateway.
- In the
Setup Nexus Cms
- Connect to Nexus CMS.
Go tohttp://your-site-name.netlify.app/admin.
ClickLogin with Netlify Identity>Continue with GitHub. - Last step: register your site url.
On the admin page, navigate toSettings>Site.
In theUrlfield enter your newly created Netlify domainhttp://your-site-name.netlify.app.
ClickPublish>Publish now, and you’re done!If you did setup a custom domain, enter your domain url instead.
User Guide
Options
Settings > Nexus
Currently available apps, themes and languages.
You’re very much welcome to contribute!
Reader apps
https://cdn.jsdelivr.net/gh/I-is-as-I-does/Nexus@latest/dist/js/NxFolio.jshttps://cdn.jsdelivr.net/gh/I-is-as-I-does/Nexus@latest/dist/js/NxIO.js
Themes
- NxFolio [default]
https://cdn.jsdelivr.net/gh/I-is-as-I-does/Nexus@latest/dist/css/NxFolio.min.css - NxIO [default]
https://cdn.jsdelivr.net/gh/I-is-as-I-does/Nexus@latest/dist/css/NxIO.min.css - NxIO [alt]
https://cdn.jsdelivr.net/gh/I-is-as-I-does/Nexus@latest/dist/css/NxIO-alt.min.css
Languages
It’s very optional, as currently only used by NxIO on-the-go editor app.
enfr
Live Preview
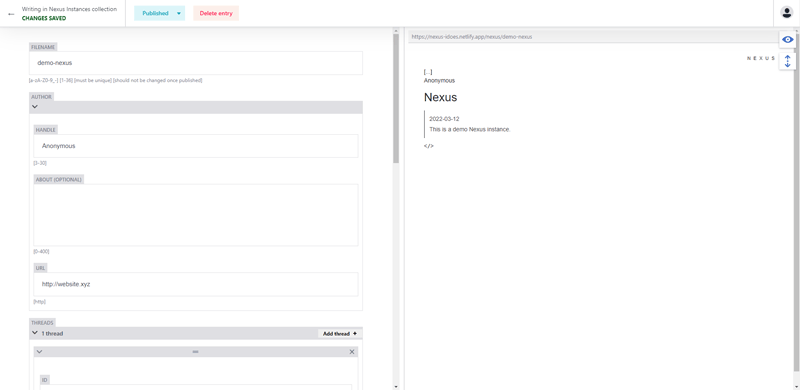
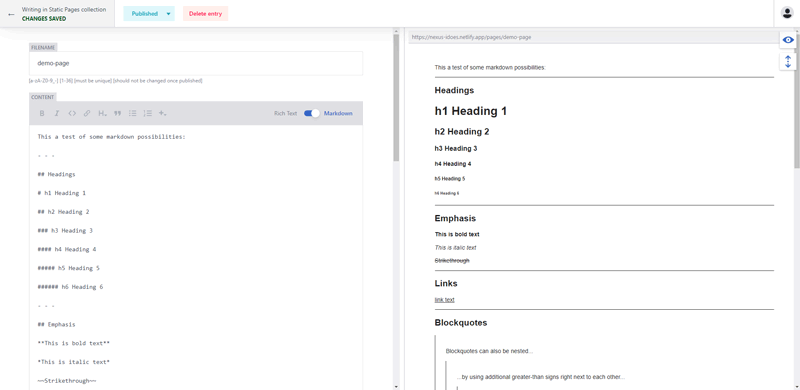
For each collections, Settings, Nexus and Pages, you’ll have a form a the left side, and a live preview on the right.
Front page
If you’ve just published some changes, then reloaded or left the /admin page, the Settings > Site preview might not be immediately up-to-date. In which case, you can simply wait a dozen of seconds, then click the eye icon to toggle off then on again the preview panel.
You can find more info on the build process in the 11ty section.
Nexus instances
If a Nexus instance preview is displaying – /–:
- either the site url your entered if
Settings>Siteis wrong; - or the current instance data is invalid.
Check the form to see if all required fields are properly filled out.
Hints of the requirements are displayed between brackets
[].
Please note that if “official” Nexus apps do support Nexus CMS live preview feature, that may not be the case if you use a custom Nexus app.
If you plan to build a custom app, check Make it yours.
Favicons
If you wish to change your website favicons, you can do in Settings > Site.
Just make sure the new files names and dimensions are exactly as specified in the form.
Urls
In the admin section, urls are displayed at the top of the preview panel.
Specific pages
- Nexus pages
http://your-site-name.netlify.app/nexus/filename - Static pages
http://your-site-name.netlify.app/pages/filename
Default pages
- Default Nexus page (as specified in
Settings>Nexus)
http://your-site-name.netlify.app/nexus - Default Static page (as specified in
Settings>Pages)
http://your-site-name.netlify.app/pages - Front page (will display either the default Nexus page, or the default Static page, as specified in
Settings>Site)http://your-site-name.netlify.app
Markdown
Static pages content can be written either in plain Markdown, or using the Rich Text editor.
You can toggle between the two modes on the content widget.
Markdown is a simple and easy-to-learn markup language used to format content.
Cheat sheet: markdownguide.org/cheat-sheet
Navigation
You can easily create a menu listing your Static pages or Nexus instances:
- edit or create a new Static page;
- on the
Contentwidget, click the+icon, thenCollection index; - select either
Nexus instancesorStatic pagesand check the result in the live preview.
To have both lists, simply add another Collection index block.
For a more custom menu, or to add a single link, you can use the Nexus instance link and Static page link blocks.
Advanced Tips
Switch to Private
By default the created repository will be public.
You can change it to private.
Your website will still be publicly accessible.
- Go to your Nexus CMS repository on GitHub.
- Click on
Settings, and in theGeneraltab scroll down toDanger Zone. - Click
Change visibilityand selectMake private.
You will then need to regenerate your Netlify token.
- Go to your Netlify site dashboard.
- Navigate to
Site settings>Identity>Services>Git Gateway. - Click
Edit settingsand finallyGenerate access token in GitHub.
Run Locally
Setup
- Clone the repository locally.
With Github CLI:$ gh repo clone I-is-as-I-does/Nexus-CMS. - Install:
$ npm install. - In
admin/config.yml: addlocal_backend: true. - Create a
_site/folder.
Serve
- Launch dev server:
$ npm run serve. - For the CMS to work, open a second terminal and run:
$ npx netlify-cms-proxy-server. - Go to
localhost:PORTfor website andlocalhost:PORT/adminfor admin (PORT is usually 8080).
Host anywhere
If you use Nexus CMS locally, you’re not bound to Netlify hosting services.
Run $ npm run build.
All built files are in the _site/ folder.
Drop the content of this folder anywhere you want.
If you plan to host the built files on an Apache server: required .htaccess files are already prepared.
Open .eleventy.js and simply uncomment the two indicated lines at the beginning of the config.
Make it yours
You can augment your 11ty site; add custom widgets to Netlify CMS; build your own Nexus app.
For a Nexus reader app to be compatible with the Nexus CMS live preview feature, it must:
- listen to change events on the
#Nexuselement - then retrieve and validate the content of
data-srcdoc.
Third Parties
GitHub
Git is a free and open source version control system.
It maintains a history of all changes made to a set a files, usually called a repository.
GitHub is a repository hosting service that provides a web-based graphical interface.
Their free tier is extremely generous with unlimited public and private repositories.
This is where your source files will be stored.
Storage limitations
- Your repository should not exceed 1GB in size.
- Each file must not exceed 25MB; this limit is stretched to 50MB if you’re using git commands.
- Since Nexus CMS generates a website, a 2MB limit is implemented for media files. Images should not actually exceed 500KB.
You are still free to store your media files on another server or platform, as long as you can provide a working direct access url.
Nexus apps also support YouTube, Vimeo and Soundcloud urls.
Netlify
Netlify is a web hosting and automation platform.
Their free tier is perfectly fine for a Nexus CMS website.
How it works
- Netlify connects to a repository containing source code
- runs a build process to pre-render files each time content gets updated
- then distributes the optimized files on a Content Delivery Network.
A Content Delivery Network is a geographically distributed network of proxy servers.
Your website will be served from the closest server to each visitor.
How it meshes with Nexus
Since the whole principle of Nexus is to connect your content to other live, self-hosted Nexus instances, the Nexus part of the page is still built on-the-fly, and not pre-rendered. The focus of Nexus CMS is more on the self-hosted matter. This solution offers a simple, seamless way to create, edit and auto-deploy Nexus instances.
For efficiency, Nexus apps that take care of this on-the-fly rendering are also hosted on a Content Delivery Network.
Netlify CMS
Netlify CMS is a Git-based open source content management system.
It handles the core functionalities of the /admin section of your website.
Nexus CMS pre-configures and augments Netlify CMS to suit the project requirements.
Live previews are custom, as well as several widgets.
The theme is also tweaked a little bit.
11ty
Eleventy, or 11ty, is an open source static site generator.
It transforms templates into static files that, once built, will not require server-side processing.
It allows for faster, safer websites, that can be hosted anywhere.
11ty is the part of Nexus CMS responsible for building your html pages and Nexus .json files.
Each time you will save a change, either to settings, a Nexus instance or a page, a new build will be triggered.
Build time
On average, an 11ty build running on a Netlify free plan takes about 2 minutes.
Nexus CMS has been designed for a faster process: it should only take 15 to 20 seconds.
If you have a lot of data though, it might be a bit longer.
